Dont Show This Again Healing Brush Photoshop

How to Reset the Tools And Toolbar In Photoshop
Learn how to chop-chop reset Photoshop's toolbar back to its default tool layout, and how to reset Photoshop'due south tools to their default settings in the Options Bar, using the Reset All Tools control in Photoshop!
Photoshop's Reset All Tools command has been around for a long time. In previous versions of Photoshop, choosing Reset All Tools would reset all of your tool settings in the Options Bar back to their defaults. This cleared away any previous, custom settings that were used. What Reset All Tools would not do, though, is reset the Toolbar itself back to its default layout. If you lot wanted to restore all of the default tools, you lot would demand to go through each spot in the Toolbar one at a time and manually choose the default tool.
In Photoshop CC, nosotros no longer need to practise that. The Reset All Tools command all the same resets the tools back to their default settings in the Options Bar. Simply now, it also resets each spot in the Toolbar back to its default, principal tool.
The improved Reset All Tools command was outset added in Photoshop CC 2014. But because it didn't get a lot of attention, many Photoshop users are unaware of it. To utilise it, and to follow along with this tutorial, you lot'll need to be running Photoshop CC (Creative Deject). You'll also want to brand sure that your copy of Photoshop CC is up to engagement.
This is lesson 3 of 10 in our Learning the Photoshop Interface serial.
Let'southward go started!
The Photoshop Toolbar
In the previous tutorial in this series, we learned all virtually the Toolbar in Photoshop. The Toolbar is where Photoshop stores all of its various tools, from selection tools to editing tools, type tools, shape tools, navigation tools, and more than. There are so many tools, in fact, that not all of them can be displayed in the Toolbar at one time. Many of Photoshop'south tools are subconscious behind other tools.
The Default Tools
For instance, Photoshop includes four basic, geometric pick tools—the Rectangular Marquee Tool, the Elliptical Marquee Tool, the Single Row Marquee Tool, and the Single Column Marquee Tool. To save space, all four of these tools are nested together in the same spot in the Toolbar. By default, the Rectangular Marquee Tool is the one that's visible. It's the default tool for the group:
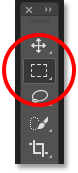
The Toolbar showing the Rectangular Marquee Tool past default.
The Hidden Tools
Near of the default tools in the Toolbar take other tools hiding behind them, nested into the aforementioned spot. To view the other tools, either click and agree, or right-click (Win) / Control-click (Mac), on the default tool'south icon. A fly-out menu will appear listing the other tools hiding behind it. Click on the proper name of a tool to select information technology. I'll choose the Elliptical Marquee Tool, just to pick something different:
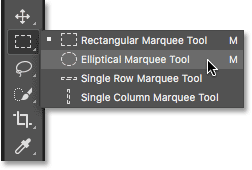
Use the fly-out menu to select whatsoever of the subconscious tools.
The Default Tool Is No Longer Displayed
Notice, though, that afterward choosing a different tool (in this case, the Elliptical Marquee Tool), the Toolbar is no longer displaying the default tool in that spot. Instead, it's displaying the new tool I selected. That's considering Photoshop e'er shows the last tool that was selected, which ways y'all won't e'er see the default tool. To select the default tool (the Rectangular Marquee Tool) at this point, I would need to click and concord, or right-click (Win) / Control-click (Mac), on the Elliptical Marquee Tool and so cull the Rectangular Marquee Tool from the fly-out menu:
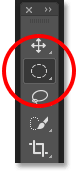
The Elliptical Marquee tool has replaced the Rectangular Marquee Tool as the visible tool in the group.
The same is true for Photoshop's freeform selection tools (the Lasso Tool, the Polygonal Lasso Tool and the Magnetic Lasso Tool). The Lasso Tool is the default tool for the grouping, so it's the tool we see initially. To select one of the other tools in the group, nosotros need to click and concur, or right-click (Win) / Control-click (Mac), on the Lasso Tool and then choose a dissimilar tool from the fly-out menu. I'll choose the Polygonal Lasso Tool:
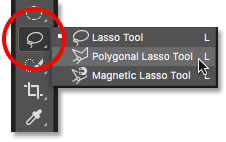
By default, the Polygonal and Magnetic Lasso Tools are hiding behind the Lasso Tool.
After selecting the new tool, we run across that the Polygonal Lasso Tool has replaced the standard Lasso Tool as the visible tool in that spot. Over again, it'south because Photoshop always displays the last tool that was selected. In fact, we now take two spots in the Toolbar where a tool other than the default, main tool is at present visible:
The Polygonal Lasso Tool has replaced the standard Lasso Tool in the Toolbar.
Selecting More Tools
Nosotros won't go through every spot in the Toolbar, but I'll quickly alter a few more of them. I'll correct-click (Win) / Control-click (Mac) on the Quick Selection Tool and choose the Magic Wand Tool from the fly-out menu:
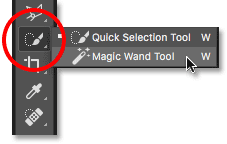
Choosing the Magic Wand Tool from behind the Quick Selection Tool.
And so I'll right-click (Win) / Control-click (Mac) on the Crop Tool and select the Perspective Crop Tool hiding behind it:
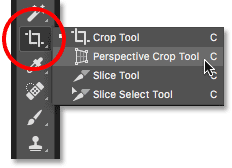
Choosing the Perspective Crop Tool from backside the standard Crop Tool.
Lastly, I'll right-click (Win) / Control-click (Mac) on the Eyedropper Tool and I'll choose Photoshop's Ruler Tool from the fly-out carte du jour:
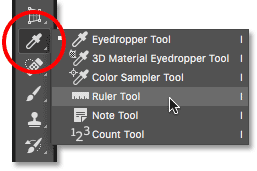
Choosing the Ruler Tool from behind the Eyedropper Tool.
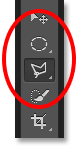
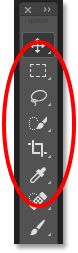
Afterward selecting these other tools, nosotros meet that my Toolbar is becoming cluttered with tools other than the defaults. It's not a huge problem, but it can make things disruptive equally you're learning Photoshop (especially if you're trying to follow forth with tutorials that ask you to select default tools). It can also be a nuisance as y'all're working:
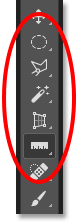
The Toolbar showing several spots where the default tool has been replaced.
How To Reset The Photoshop Toolbar And Tool Settings
Pace i: Select A Default Tool
Luckily, we now have a way to instantly reset Photoshop's Toolbar back to its default layout thanks to the improved Reset All Tools control. Just before we reset the Toolbar, there's one important stride we demand to exercise. In order for this to work, we first need to select a spot in the Toolbar where the default tool is still visible. In my case (and most likely yours, too), the spot at the very top of the Toolbar is nevertheless showing the Move Tool. The Move Tool is the default tool for its grouping. Click on the Motion Tool to select information technology. You can also select the Motion Tool by pressing the letter Five on your keyboard. Note that the Movement Tool itself is not what'south important hither. You can select any tool as long equally it's the default tool for its group:
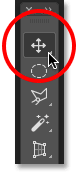
Selecting the Move Tool at the top of the Toolbar.
Stride 2: Cull "Reset All Tools" In The Options Bar
With a default tool selected in the Toolbar, if you lot look up in the Options Bar along the top of the screen, you'll discover the Tool Presets option over on the far left. The Tool Presets option doesn't have an icon of its own. Instead, it displays the icon of whichever tool is currently selected. In my instance, it'due south the Movement Tool:
The Tool Presets option on the far left of the Options Bar.
To reset your Toolbar back to its default layout, right-click (Win) / Control-click (Mac) on the Tool Presets icon. Then choose Reset All Tools from the menu:
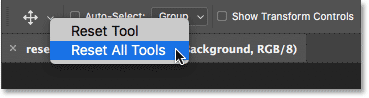
Choosing the "Reset All Tools" control.
Pace 3: Click OK
To confirm that you want to reset the tools and the Toolbar, click OK:
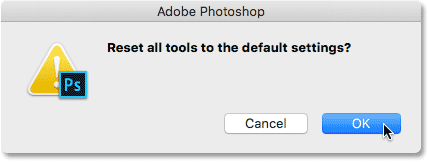
Clicking OK to restore the default tool and Toolbar settings.
And but like that, my Toolbar is back to its original layout, with all of the default tools once over again visible. And, if I was to select any of the tools, I would see that all of its options in the Options Bar have been reset to the defaults:
Each spot has been instantly reset to its default tool thanks to the improved Reset All Tools command.
Where to get next...
And at that place we accept it! The improved Reset All Tools command is bang-up, but it's not the only characteristic that Adobe has added to the Toolbar. As of CC 2015, Photoshop's Toolbar is now fully customizable, allowing us to finally create custom Toolbar layouts that ameliorate match the mode we work! In the adjacent lesson, we'll learn how to customize the Toolbar in Photoshop!
You can jump to any of the other lessons in this Learning the Photoshop Interface affiliate. Or visit our Photoshop Basics section for more topics!
Other Stuff
© 2022 Photoshop Essentials.com.
For inspiration, not duplication.
Site design by Steve Patterson.
Photoshop is a trademark of Adobe Systems Inc.
Source: https://www.photoshopessentials.com/basics/reset-toolbar-photoshop-cc/
0 Response to "Dont Show This Again Healing Brush Photoshop"
Post a Comment